Physics Practical Copy Class 10: Complete Guide
A physics practical copy is much more than a notebook where you paste readings after an experiment. It is the written record of your laboratory work, and examiners judge it as evidence of what you actually did, observed, and understood. A strong copy shows a clear aim, a sensible list of apparatus, a short theory, a step-by-step procedure, a well-drawn observation table, a graph where one is needed, and an honest result followed by precautions. This guide explains the full format for a Class 10 physics practical copy, experiment by experiment, so that every page you write looks organised, readable, and exam-ready. You will also learn how to draw diagrams, present readings, and avoid the small errors that quietly cost marks.
What a Physics Practical Copy Really Is
Your practical copy is your laboratory diary, and it should read like one. When an examiner opens it, they want to see that you performed the experiment yourself, understood what you were measuring, and recorded what actually happened rather than copying a perfect-looking answer from somewhere else. That is why the copy is judged on completeness, order, neatness, and honesty of observation, not on whether every reading looks textbook-perfect. A copy with genuine readings, a small correction, and a sensible result always looks more believable than a copy where every number is suspiciously exact.
Think of each experiment as a short report with the same skeleton every time. You state what you wanted to find out, list what you used, explain the idea in a few lines, describe what you did, record what you measured, work out the result, and finish with the precautions you took. Once this skeleton becomes a habit, writing up any experiment takes far less time, because you are never wondering what to write next. The rest of this guide fills in that skeleton for Class 10 physics, from the first page of the copy to the final result line. For general study material to revise the theory behind each experiment, browse the book collection and the solved notes.
The Standard Page Format for Every Experiment
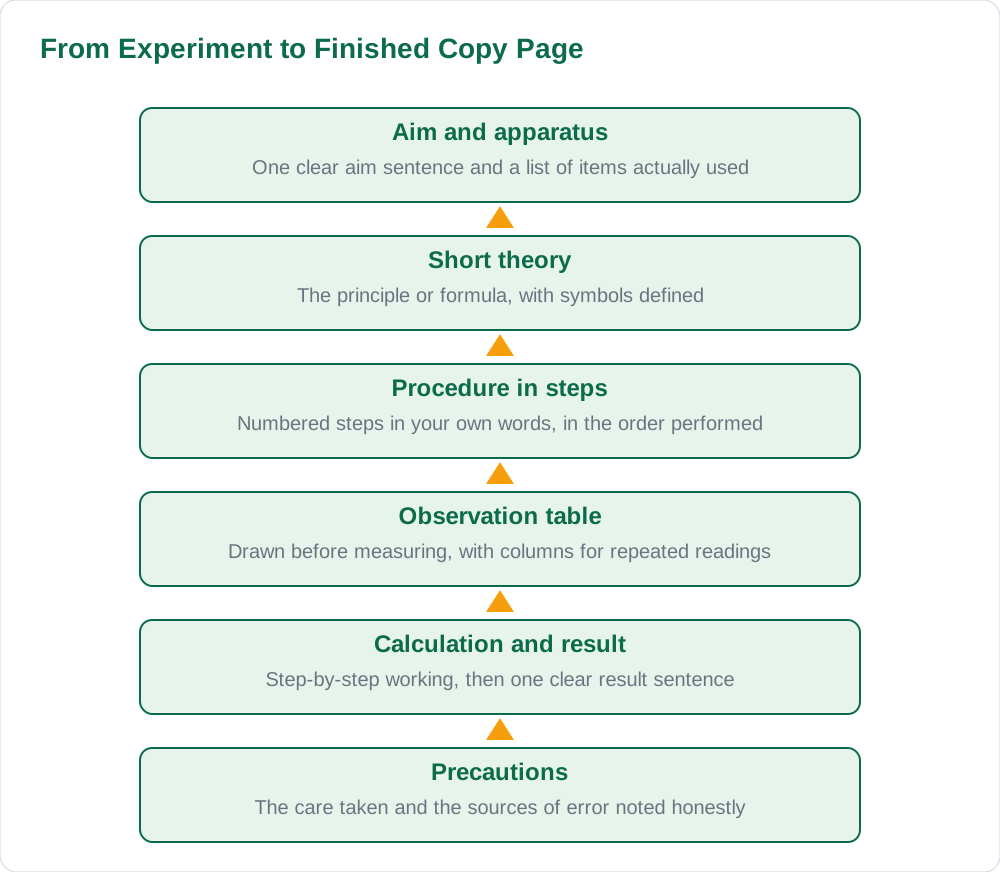
Start each experiment on a fresh page with the experiment number and a clear title at the top, written in the same style every time. Then write the aim in one sentence: what quantity you are finding or what law you are verifying. Follow it with the apparatus list, naming each item you actually used, such as a metre rule, a convex lens, a voltmeter, or a stopwatch. Keep the theory short, two to four lines that state the principle or formula you are using, with symbols defined. Long copied theory wastes space and examiners rarely reward it; a short, correct statement of the idea is worth far more.
The procedure comes next, written as numbered steps in your own words, describing what you did in the order you did it. After the procedure, draw the observation table before you fill it in, with columns for each quantity you measured and space for repeated readings. Then comes the calculation, shown step by step, followed by the result in one clear sentence, and finally the precautions. Keep one consistent layout across all experiments, because a copy that looks the same from experiment to experiment is much easier for an examiner to read and mark. A simple, repeated format is a sign of a careful student.
Experiments You Will Meet in Class 10 Physics
Class 10 physics practical work usually covers a small set of core experiments, and knowing them in advance makes the copy far easier to prepare. Typical experiments include verifying Ohm's law by measuring current and voltage, finding the focal length of a convex lens, studying the image formed by a lens or mirror, measuring the time period of a simple pendulum, and investigating the factors that affect resistance. Each of these follows the same page format, but the observation table and the graph change with the experiment, so prepare the table shape for each one before you enter the laboratory.
The smart way to prepare is to write the skeleton of each experiment at home: title, aim, apparatus, theory, and procedure, leaving the observation table and result blank to fill during the practical. Then, in the laboratory, you only need to record readings and finish the calculation, which saves time and reduces mistakes. Do not pre-fill readings at home, because readings must come from the actual experiment. A copy that is half-prepared honestly is worth far more than a copy that is fully written without any real experiment behind it. Your teacher can confirm which experiments your class will perform, so check with them first.
Observation Tables and Graphs That Earn Marks
A good observation table has a title, clear column headings with units, and enough rows for repeated readings. Always write the unit with the quantity in the heading, for example length in centimetres or current in amperes, and keep the same number of decimal places down a column. Take at least three readings where the experiment allows it, and show the mean clearly. If a reading looks wrong, do not overwrite it into a mess: cross it out once with a single line, write the corrected value beside it, and carry on. Examiners respect an honest correction far more than a page full of hidden overwriting.
Graphs need the same care. Choose scales that spread the points across the page, label both axes with quantity and unit, and plot points as small crosses or dots, not blobs. Draw the best-fit line or curve smoothly through the points rather than joining them dot to dot, unless the experiment asks for a joined plot. Give the graph a title and write the result it shows, such as the slope or the focal length read from it. A graph drawn on graph paper, pasted neatly, and labelled properly is one of the fastest ways to make a copy look professional, so never rush it at the end of the lesson.
Common Mistakes That Cost Marks
The most common mistake is writing the whole experiment from memory at home without doing it, which produces readings that do not match the apparatus and a procedure that reads like a textbook rather than a lab report. The second is untidy presentation: no margins, crossed-out paragraphs, diagrams squeezed into corners, and tables drawn after the readings were already taken. A third mistake is missing parts, especially the result sentence and the precautions, which many students skip when time runs short. Every missing part is a lost opportunity, because examiners can only mark what is actually on the page.
Other frequent errors include forgetting units, mixing up symbols, writing the theory in pages of copied text, and drawing diagrams freehand without a ruler or labels. Diagrams should be drawn in pencil, with straight lines ruled and labels written horizontally with leader lines that do not cross. Check each finished page against a short checklist: title, aim, apparatus, theory, procedure, table, calculation, result, precautions, and diagram where needed. If one item is missing, add it before moving on. That one-minute check at the end of each experiment protects marks across the whole copy.
AI Help: Muse AI
Muse AI is Meta's personal AI assistant, and it can help you prepare a physics practical copy by explaining an experiment's theory in simple words, suggesting a clean observation table layout, or turning your rough procedure notes into clear numbered steps. For example, you can ask it to explain how to plot a voltage-current graph or what precautions suit a lens experiment, then write the answer in your own words in your copy. Join Muse with invite code LTGSWD — in the Muse app, go to Settings > Redeem token and enter the code. Disclosure: LTGSWD is the author's Muse invite code. Muse AI does not give official Sindh Textbook Board answers — always verify against your Sindh Textbook Board book and your teacher.
5 key points you must know
- Use the same page skeleton for every experiment: aim, apparatus, theory, procedure, table, calculation, result, precautions.
- Draw the observation table before measuring, with units in the headings and space for repeated readings.
- Plot graphs with labelled axes, sensible scales, and a smooth best-fit line, not dot-to-dot joins.
- Correct a wrong reading with a single line through it, never by overwriting into a mess.
- Check every finished page against a short checklist before moving to the next experiment.
Frequently asked questions
How long should each physics experiment write-up be?
Most experiments fit neatly on two to three pages: one page for aim, apparatus, theory, procedure and diagram, and one or two pages for the observation table, graph, calculation, result and precautions. Length matters less than completeness, so cover every part of the skeleton rather than padding the theory.
Should readings be written in pen or pencil?
Write the main text in pen and draw diagrams and graphs in pencil, which is the usual laboratory convention. Record readings in pen as you take them, because a reading book in pencil looks easy to alter. If you must correct a reading, cross it once and write the new value beside it.
What if my result does not match the expected value?
Report the result you actually obtained and note the likely sources of error in the precautions section, such as parallax error or loose connections. Examiners mark honest work with sensible error discussion, while a copied perfect result that does not match your readings looks dishonest and earns less.
Do I need a diagram for every physics experiment?
Most experiments benefit from a labelled diagram of the apparatus arrangement, and some, like lens or circuit experiments, really require one. Draw it in pencil with ruled lines and horizontal labels. If an experiment has no apparatus to draw, a labelled graph or ray diagram usually fills that role.
Can I prepare parts of the copy before the practical lesson?
Yes, prepare the title, aim, apparatus, theory, procedure and blank observation table at home, but leave readings, calculations and results blank until the experiment is done. Pre-filled readings are not your measurements, and examiners can usually tell.
Solved notes — preview free
These guides work best with the solved exercises. Preview the solved notes free on this website — 119 solved notes for Classes 6–10 in Sindhi, Urdu, English and Arabic medium. Or browse the full solved notes catalogue for your class and medium. New solved notes are added regularly — check the catalogue for coming-soon books.