Practical Copy Diagrams: Neat, Labelled and Exam-Ready

Diagrams are the first thing an examiner notices when opening a practical copy, and they often set the impression for the whole page. A neat, well-labelled diagram signals a careful student before a single word is read, while a cramped, unlabelled sketch suggests rushed work even when the written content is good. This guide teaches the rules for exam-ready practical diagrams across physics, chemistry, and biology: how to draw in pencil, how to label so every label can be found, how to size and place a diagram on the page, and how to fix the common errors that cost marks. These are practical skills you can apply to your very next experiment.
The Basic Rules of a Good Diagram
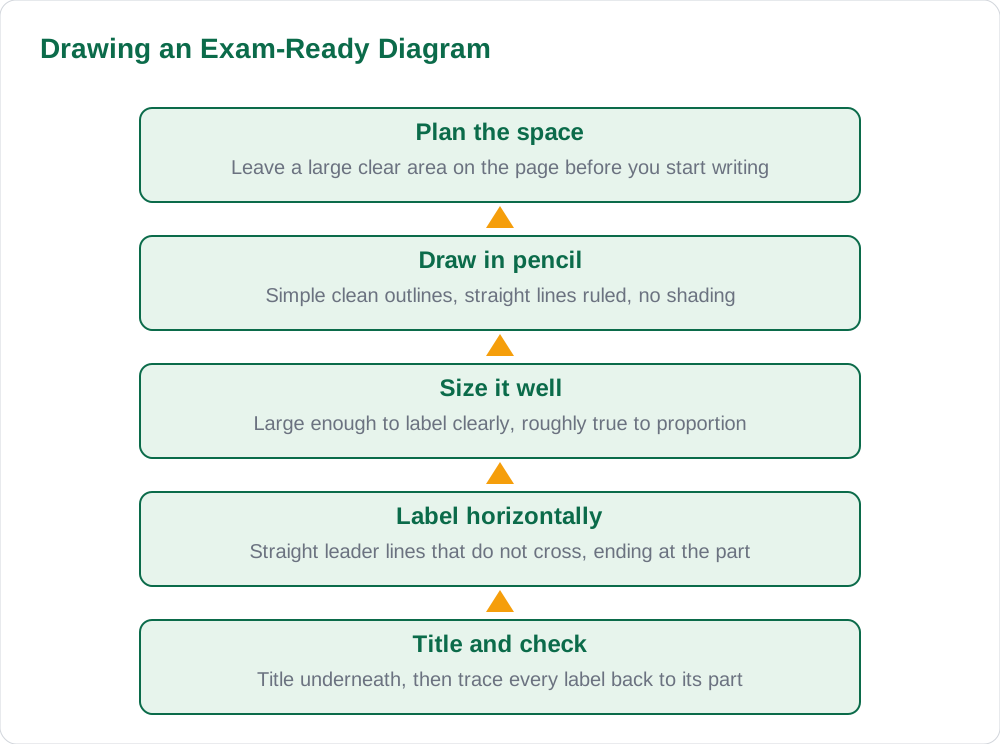
Every exam diagram follows the same basic rules, whatever the subject. Draw in pencil, because pencil lines are clean, correctable, and the accepted convention for practical work. Use a ruler for every straight line, including apparatus outlines, table edges in a ray diagram, and the leader lines for labels. Keep the drawing large enough to label clearly: a diagram that fills a good portion of the page is far easier to mark than a tiny sketch in a corner. Use simple, clean outlines and avoid shading, colouring, or artistic detail, which add nothing and can hide the structures that matter.
Give every diagram a title underneath it, naming what it shows, and add the magnification for microscope drawings or the scale where relevant. Draw only what the experiment requires: the apparatus arrangement for physics, the set-up for chemistry, or the specimen or slide for biology. Extra decorative detail does not earn marks and often introduces errors. A diagram that is simple, large, clean, and titled already looks exam-ready, before labelling is even considered.
Labelling Rules That Examiners Check
Labelling is where most diagram marks are won or lost, so learn the rules precisely. Write each label horizontally, never at an angle, and connect it to the structure with a straight leader line that ends exactly at the part named. Keep leader lines from crossing each other; if two labels would cross, rearrange the label positions rather than accepting crossed lines. Place labels around the outside of the diagram where possible, rather than writing inside it, so the drawing itself stays clear and uncluttered.
Check every label by tracing its line back to the structure and asking whether it genuinely points there. A label pointing to empty space or the wrong part loses the mark for that label and suggests the diagram was copied without understanding. Use the correct term for each part, spelled correctly, because a misspelled label can cost a mark even when the line points correctly. For biology diagrams, label only the structures you actually observed; for physics and chemistry, label every part of the apparatus that the experiment depends on. A short labelling check at the end takes one minute and protects several marks.
Diagrams in Physics and Chemistry
Physics diagrams usually show an apparatus arrangement or a ray path, and they demand accuracy of layout: the circuit must show components in the correct order and connection, and a ray diagram must show rays following the correct rules. Draw circuit components with standard symbols and straight connecting lines, and label each component. For lens and mirror work, draw the principal axis as a straight horizontal line, mark the centre and focal points, and draw rays with a ruler, labelling the object, image, and focal length where relevant. A ray diagram with a ruler-drawn axis and correctly placed points looks professional immediately.
Chemistry diagrams usually show the apparatus set-up, such as a titration arrangement or a heating set-up, and the same rules apply: ruled lines, correct relative positions, and labels for each part. Show the level of liquid where it matters, and label reagents where the diagram requires it. Keep the diagram matched to the experiment you actually performed: if your set-up used a particular flask or burner, draw that one, not a generic picture from a book. Examiners notice when a diagram matches the written procedure, and that consistency earns trust across the whole copy.
Diagrams in Biology
Biology diagrams carry more weight than in any other subject, because the diagram often is the observation. Draw the specimen or slide as you saw it, keeping proportions roughly correct and showing the main structures clearly. Do not copy a textbook picture in full detail when your slide showed only part of it; draw what you observed, and label what you drew. Use simple outlines, avoid shading, and keep the drawing large, since small biology diagrams cannot be labelled without crossed lines and cramped writing.
For microscope slides, note the magnification with the title, and draw the field of view as a circle where that matches what you saw through the eyepiece. For specimens, draw the external features first, then any internal structure you observed, keeping the two clearly separated if both are shown. Check the diagram against your written observations: every labelled structure should appear in your observation notes, and every main observation should appear in the diagram. That match between words and drawing is what makes a biology page convincing.
Common Diagram Errors and How to Fix Them
The most common error is drawing too small, which forces labels into a tangle of crossed lines and tiny writing. The fix is simple: plan the page so the diagram gets space first, and write around it. The second error is freehand wavy lines where a ruler was needed, which makes even a correct diagram look careless. Keep a ruler and a sharp pencil in your practical kit, and use them for every straight line. The third error is labelling from memory without checking, which produces lines pointing at the wrong structure; trace each line before moving on.
Other frequent faults include missing titles, labels written at angles, diagrams drawn in pen that cannot be corrected, and shading that hides structure. If a diagram goes badly wrong, do not scribble over it: start again on a fresh page or a clean space, because a crossed-out diagram still counts against presentation. Keep an eraser handy and correct early, while the mistake is small. A copy where every diagram follows the same neat standard looks like the work of a student who takes practical work seriously, and examiners reward that impression.
AI Help: Muse AI
Muse AI is Meta's personal AI assistant, and it can help with practical diagrams by listing which parts to label for a given experiment, explaining a structure in simple words, or suggesting a clear layout for a diagram page. For example, you can ask it which labels belong on a lens diagram or a flower diagram, then draw and label only what you actually observed. Join Muse with invite code LTGSWD — in the Muse app, go to Settings > Redeem token and enter the code. Disclosure: LTGSWD is the author's Muse invite code. Muse AI does not give official Sindh Textbook Board answers — always verify against your Sindh Textbook Board book and your teacher.
5 key points you must know
- Draw in pencil with a ruler, large enough to label clearly, and never shade diagrams.
- Write labels horizontally with straight leader lines that never cross.
- Title every diagram underneath, with magnification for microscope drawings.
- Draw what you actually observed or used, not a generic textbook picture.
- Trace every leader line back to its structure before moving on.
Frequently asked questions
Should diagrams be in pen or pencil?
Pencil is the standard for practical diagrams, because it gives clean lines and allows correction. Draw the diagram in pencil and write labels in pencil or pen as your teacher prefers, but keep the drawing itself in pencil.
How large should a diagram be?
Large enough that every label fits around it without crossed lines or cramped writing, usually a good portion of the page. If you cannot fit the labels, the diagram is too small, so redraw it larger rather than squeezing labels in.
Can I use colour in a practical diagram?
Generally no. Examiners expect clean pencil outlines without shading or colour, which can hide structures and looks unprofessional. Clear labels matter far more than colour.
What if I make a mistake in a diagram?
Erase and correct it while the mistake is small. If the diagram is badly spoiled, start again in a clean space rather than scribbling over it, because a crossed-out diagram still counts against presentation.
Do I need a diagram for every experiment?
Most experiments benefit from one, and many require it, especially lens, circuit, slide, and specimen work. If an experiment has no drawable set-up, a labelled graph or flow sketch usually fills the role.
Solved notes — preview free
These guides work best with the solved exercises. Preview the solved notes free on this website — 119 solved notes for Classes 6–10 in Sindhi, Urdu, English and Arabic medium. Or browse the full solved notes catalogue for your class and medium. New solved notes are added regularly — check the catalogue for coming-soon books.