Class 9 Maths: Constructions With Compass and Ruler

The class 9 maths construction compass topic is different from the rest of geometry because it is practical: you must actually draw accurate figures using only a compass and an unmarked ruler, with no protractor allowed. The core skills are bisecting a line segment, bisecting an angle, drawing a perpendicular from a point, and constructing standard angles such as 60 degrees and 90 degrees. Every construction rests on the same idea, which is drawing arcs of equal radius from two centres so that their intersection points define the new line. This article gives each construction as a numbered sequence you can follow at your desk, explains why it works, and lists the accuracy habits that earn full marks. For more Class 9 maths help, visit the [solved notes collection](/solved.html) and the [books library](/books.html).
Tools, Setup and Accuracy Habits
A good construction starts before you draw. Use a sharp pencil, because a blunt pencil makes arcs wide and intersection points vague. Keep the compass joint firm so the radius does not slip mid-arc, and press lightly at first so mistakes can be erased cleanly. Draw construction arcs long enough to cross clearly, and never rub them out at the end unless the question says to, because examiners award marks for visible construction arcs that prove you used a compass rather than a protractor. Label every point as you create it, and write the construction steps beside the diagram if the question asks for them.
Accuracy is judged by measurement, so a careless construction loses marks even when the method is right. Check your compass radius by testing it against the segment before drawing, and avoid changing the radius in the middle of a step. Work on plain paper or in the answer space without folding the page, since a fold distorts arcs. If an arc misses its intended crossing, do not fudge the line to meet it; erase and redraw with a corrected radius. Practise each construction three or four times before the exam so that the hand movements feel natural and you do not have to think about the mechanics while also thinking about the geometry.
Bisecting a Line Segment
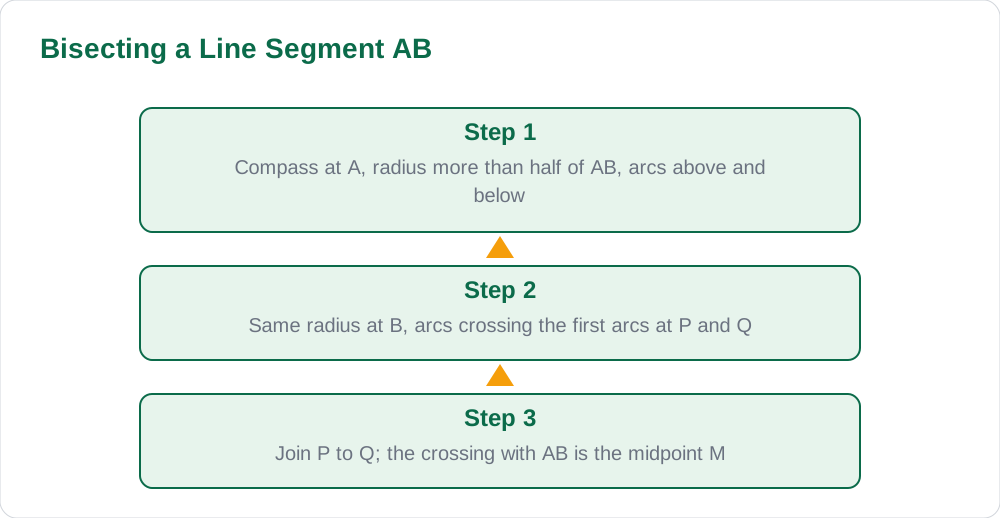
To bisect a line segment AB, place the compass point at A and open it to more than half of AB. Draw arcs above and below the line. Without changing the radius, place the compass point at B and draw arcs above and below the line, crossing the first arcs at two points, call them P and Q. Join P to Q with the ruler. The line PQ crosses AB at its midpoint M, and PQ is the perpendicular bisector of AB. Every point on PQ is equidistant from A and B, which is why the construction works: P and Q were each drawn at the same radius from both A and B.
The phrase more than half is essential. If the radius is less than half of AB, the arcs from A and B will not meet, and there will be no crossing points to join. If it is exactly half, the arcs will only just touch, giving a single unclear point. A safe habit is to open the compass to roughly three quarters of the segment. After drawing, check your result by measuring: AM should equal MB, and the angle at M should be 90 degrees. If either check fails, the radius probably slipped between the two arcs, so repeat the construction with a firmer compass setting.
Bisecting an Angle
To bisect an angle with vertex O, place the compass point at O and draw an arc cutting both arms of the angle at points A and B. Without changing the radius, you may now place the compass at A and draw an arc inside the angle, then place it at B with the same radius and draw a second arc crossing the first at point P. Join O to P, and OP is the angle bisector. The construction works because the two triangles formed by the equal radii are congruent by SSS, so the angles at O are equal. This is a good example of a construction whose proof uses a congruence condition, and stating that reason can earn an explanation mark.
Common errors include changing the radius between the arcs from A and B, which destroys the symmetry, and drawing the second arcs outside the angle, where they may still cross but give the bisector of the reflex angle instead. Keep the arcs inside the angle and roughly in its middle region. After constructing, check by folding the paper mentally: the two halves of the angle should match. If your teacher asks you to bisect an angle and then construct a further angle from it, keep the bisector line drawn clearly, because later steps will build on it, and a faint line is easy to lose.
Drawing Perpendiculars
There are two perpendicular constructions, and students often confuse them. The first draws a perpendicular from a point P on a line: place the compass at P and draw an arc cutting the line at two points A and B on either side of P. Then, using A and B as centres with the same radius greater than half of AB, draw arcs that cross at Q. Join P to Q, and PQ is perpendicular to the line. The second draws a perpendicular from a point P above a line: place the compass at P and draw an arc cutting the line at A and B, then proceed exactly as before, joining P to the crossing point of the arcs. The steps are nearly identical; only the starting position of P differs.
A useful check is that the perpendicular is the shortest distance from the point to the line, so if your constructed line looks longer than a slanted alternative, something is wrong. Another check is the right angle itself: measure it roughly with the corner of a page if you are unsure, since a page corner is a true right angle. Perpendicular constructions appear inside many longer constructions, such as constructing a rectangle or dropping an altitude of a triangle, so practise them until the sequence of arcs is automatic. The perpendicular bisector from the earlier section is a close relative, and the same equal-radius idea drives both.
- Point on the line: arc from P cuts the line at A and B, then equal arcs from A and B cross at Q.
- Point off the line: arc from P cuts the line at A and B, then the same finishing steps apply.
- Keep the radius greater than half of AB in both cases so the arcs actually cross.
Constructing 60 Degrees and 90 Degrees
The 60-degree construction is the foundation for several standard angles. Draw a line and mark a point O on it. Place the compass at O and draw an arc cutting the line at A. Without changing the radius, place the compass at A and draw an arc cutting the first arc at B. Join O to B, and angle AOB is 60 degrees. The reason is that OA, OB and AB are all equal to the same radius, so triangle OAB is equilateral, and every angle of an equilateral triangle is 60 degrees. This is a beautiful example of a construction whose proof is a single sentence, and you should write that sentence when the question asks why the construction works.
Once you have 60 degrees, you can build more angles. Bisecting the 60-degree angle gives 30 degrees. Constructing a 60-degree angle on each side of a point, or bisecting the angle between a 60-degree line and the perpendicular, gives 90 degrees through the standard route: construct a perpendicular as above, which is 90 degrees directly. Combining steps gives 120 degrees as two 60-degree angles side by side, and 15 degrees by bisecting 30 degrees. In an exam, plan the chain before you start drawing, because each angle depends on the previous one, and a mistake early in the chain affects everything after it. More construction practice ideas are in the study tips section.
AI Help: Muse AI
Muse AI is Meta's personal AI assistant. It can help with this topic by listing the steps of a construction in order, or by explaining why equal-radius arcs guarantee an exact bisector.
Join Muse with invite code LTGSWD — in the Muse app, go to Settings > Redeem token and enter the code. Disclosure: LTGSWD is the author's Muse invite code. Muse AI does not give official STBB answers — always verify against your STBB book and your teacher. Always verify against your Sindh Textbook Board book and your teacher before using anything in classwork.
5 key points you must know
- Use a sharp pencil, a firm compass, and visible construction arcs that you do not erase.
- To bisect a segment, draw equal arcs from both ends with radius more than half the segment.
- To bisect an angle, cut both arms with one arc, then draw equal arcs from those points inside the angle.
- Perpendiculars use the same equal-arc idea from two points on the line.
- A 60-degree angle comes from an equilateral triangle built with one radius throughout.
Frequently asked questions
Why must the radius be more than half the segment?
Because arcs drawn from the two ends must overlap to create crossing points. With a radius of half the segment or less, the arcs meet at most at one point or not at all.
Can I use a protractor in a construction question?
No. Construction questions require compass and ruler only. Using a protractor defeats the purpose and loses the method marks, even if the final angle looks correct.
Should I erase construction arcs when finished?
No, unless the question says so. Visible arcs prove you constructed the figure properly, and examiners award marks for them.
Why does the 60-degree construction work?
All three sides of the triangle formed are equal to the compass radius, so the triangle is equilateral, and every angle of an equilateral triangle is 60 degrees.
How do I construct 30 degrees?
Construct a 60-degree angle first, then bisect it with the angle-bisector construction. The two resulting angles are each 30 degrees.
Solved notes — preview free
These guides work best with the solved exercises. Preview the solved notes free on this website — 119 solved notes for Classes 6–10 in Sindhi, Urdu, English and Arabic medium. Or browse the full solved notes catalogue for your class and medium. New solved notes are added regularly — check the catalogue for coming-soon books.